Thursday, May 27, 2010

Sarameya zerg

Thursday we finished WoA's ZNM runs for this month. We had been doing Tier3's and by the number of pops I could tell we'd have more pops than we had for Tinnin. However, I did not expect we'd have 7! I had been discussing zerging it with Kingcem since we knew it would drag out if we didn't. The alternative would be to bring as many SMN's and RNG's as you can, some good healing support and perhaps have tanks go with a fire resist set for Chainspell.

Zerging it didn't need any special preps, just regular zerg setup without even a need for a Chainspell Stunner. We set up the alliance with three Bards, two White mages, a Scholar, a Summoner and the rest DD's. The bards rotated, a WHM went to the SCH party for Shellra5, the Summoner got in for Hastega in the SCH party and we were off to the races.

The first fight was very rough since plenty of DD died early on and a Ullulation got off very early keeping DD's and mages paralyzed for 90% of the fight. Also, it seems Tipira on SMN wasn't able to keep people alive as well as we had hoped. Arrekusu was outside on SCH because Accessioned Cures work outside alliance. Skinwalker asked people that were still up to 2hr the last 20-25%. It went down, but not clean at all. Second pop we had White mages and Bards run out of range before the pop. Also, we had Arrekusu inside alliance this time. It would be easier for him to see HP's and make curing easier. Also, I believe Accession Stoneskin was used. Second fight was much smoother since no DD's went down.

With my parser running it quickly turned into a contest of who could do the most damage. Healthy competition pushes people to be better, so I'm all for it. I parsed 6 of the 7 fights but 3 of them I didn't save. I filtered misses for everyone but myself, so accuracy for everyone else is 100%.

Third fight
I was using Great Katana and not playing smart. I think I even forgot some buffs.

Fifth fight
I actually used Sekkanoki this time around with enough TP to WS twice at start. Switched back to Polearm.

Seventh and final fight
Everyone that hadn't used their 2hr did. Argonar won comfortably with Mighty Strikes up. He had gotten Hachiryu Haidate the fight before. This was icing on that cake.

Here's a video of that last fight. Not much to see. You can notice how I spam Penta thrust, then cancel Meikyo and do one more so I actually gain TP from the WS. I then even have time for 6th Penta.

Wednesday, May 26, 2010

Damage mitigation overview, part 2

In part1 I talked about a couple of passive defense mechanisms for melee damage and how they interact. I also tried to make a case for evasion complementing the traditional Defense, PDT and Utsusemi. This time I want to talk about the effect of debuffs on damage mitigation and one less common form of defense. However, before that I'd like to add one more passive form of defense to the list.

Shield Blocks
There are different sources I used for the numbers I'm about to use. Check this post and this one for a summary. It's estimated that the popular size 3 shields (like Koenig and Terror) proc between 40% to 50% on "high level targets". Those quotes should tell you that it's a vague generalization, but it seems like a fair assumtion. I'll limit myself to Koenig Shield for the moment, for the sake of simplicity. It reduces an estimated 61% of your damage when it blocks. For all attacks that are subject to shield blocks, you'd see an approximate 24% to 30% damage reduction overall. This reduction is different from Physical Damage Taken and are applied seperately. What's interesting though is that shield damage reduction is considerably more than a lone Earth Staff would get you and yet people used that before the addition of Shield Mastery and Reprisal while that update didn't improve the rate of shield blocks in general. Why even mention Earth Staff? More is better and why would you give up your sword? Well, one reason would be the reliability of PDT over shield blocks. For melee hits this doesn't matter much since you'll be taking so many of them that the reliability evens out. However, if you can get one shotted by a physical TP ability, the reliability all of a sudden becomes paramount. Add to that the fact that Earth Staff's PDT weighs heavier if you're already wearing some other PDT gear and you've got yourself a serious option for higher end fights.

Killer Effects
The ablity to intimidate a mob is not readily available to all jobs and for all mob families. In cases where you fight Aquans, a Bibiki Seashell adds Aquan Killer while taking a slot that doesn't sacrifice any fundamental stats. An item with a meager 1% proc rate Killer effect is still 1% less melee damage taken over time. Again, when stacked, this trait would become increasingly useful. Unfortunately the gear options are limited and the proc rates mostly unknown.

Paralyze
This is very similar in nature to intimidation procs. Some mobs seem more susceptible to Paralyze than others, but even with a low proc rate of 5%, it's still 5% fewer attacks. Intimidation and paralysis increase the longevity of Utsusemi shadows when they proc before the first or second shadows are taken. Generally after the second is down (or third for Utsu: Ni on Ninja main) you want to start casting your next set if at all possible to minimize the chance of interruption or taking damage. In cases of high damaging and frequent triple and double attacks you might want to recast even sooner. In short, you can't depend on them, but they do help and if Paralyze can be landed at a cost of 6 MP (or 36 MP Paralyze II) there's no reason it shouldn't be on a mob. More reliable enfeebles are...

Slow and Elegy
These are very powerful debuffs. With Carnage Elegy adding a whopping 50% delay to a mob's attack speed and Slow generally sitting at around +20%. Aside from the direct impact it has on the number of attacks a mob will use during the course of a fight, it also allows a tank to easily cast Utsusemi: Ichi in between attack rounds of almost any mob. Assuming 70% extra delay on a mob's attack speed, Slow and Elegy add up to 41% less melee damage taken over time. I calculate it using:

1 - 1/(1+SLOW_%)

Adding it all together
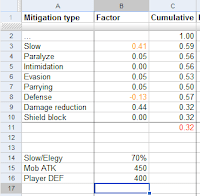
I've listed a lot of ways to reduce damage in this and part 1 of this overview. To give you an idea of how much of an impact this has when you put it all together, here is a little spreadsheet I made for a RDM tank in a standard PDT set with floored evasion and parrying rate, standard slow and elegy and paralyze, 400 defense and mob attack of 450.


The "Factor" column is how much that particular form of damage reduction is worth. The "Cumulative" column is what a mob's damage output is reduced to after applying all the reductions in sequence. In this particular instance the mob's damage output is reduced to 32% of what it was originally. It's quite a dramatic change and doesn't even factor in Phalanx and Utsusemi. Add to those a second tank and it's hard to imagine why any mob would ever give you trouble. This is where I then have to remind myself about the duration of some fights, mob abilities that do massive damage or inflict strong enfeebling effects, mob immunities to debuffs, enmity issues and the player skill and coordination needed to keep all buffs on tanks and debuffs on mobs while still taking it down before it depops or rages.

Coming from a background of playing THF and using an evasion set to tank things on what is normally not considered a tank job, I can't resist to point out that if you managed to cap evasion through use of Blind, Mambo's and gear you'd actually reduce a mob's damage output to 12% under similar conditions. The obvious flaws of tanking on THF are the inability to generate hate independantly like other tank jobs and the unreliable nature of evasion to survive many mob TP abilities.

I've gained some insight into the different ways one can reduce damage and how different tanking jobs compare. Not surprisingly there are more ways to tank than what is considered the norm. Some forms of defense haven't even been mentioned yet. Things like Stoneskin and Seigan are a bit harder to quantify than what I've included here. All these things can be mixed and matched to shape all sorts of tanks as long as we're willing to try.

Tuesday, May 25, 2010

RDM/NIN straight tank: second time out


Last week on Thursday we had a run at a Tier3 ZNM on the Sarameya path called Nosferatu. It's the Vampire humanoid type mob with long nails and a huge library of abilities. It's a fight with a lot of different aspects you need to deal with. For one, the pull requires you to clear a room of Chigoes, 2 morbol and some funguar on the way back to the zoneline. Zonelines are by far the best place to fight ZNM's in general and this is no exception. The second thing to deal with is the large bursts of damage caused by its pets. It will summon 3 or 4 mobs consisting of bats, hellhounds and fomor which will all do a TP ability out of their arsenal and then disappear. At one point he will use Astral Flow which will cause the same thing to happen except that it seems he himself joins them in doing a TP move for a very large burst in damage that has a good chance of killing almost any tank. Another thing to take care of is the gaze doom attack he uses as a regular TP ability. Cursna is pretty reliable if everyone spams it on the tank, but things get hairy when there are multiple people doomed at the same time. The final cheesy bit of this fight is the ability it has to do a cone charm attack called Nocturnal Servitude. The charm effect lasts for 30+ seconds and like all charm attacks resets hate for the main target. That makes it hard for a single tank to last for the full duration of the fight.

The first fight we had a single PLD tank. We quickly learned that you need backup for when the "Animals Attack". So with some zone DoT recovery we took it down for the second half of its HP. To make the next 4 pops a bit more bearable. I suggested I switched to RDM/NIN and tank it backwards. With mostly RNG and SMN DD's we took considerably less time on the rest of the fights. Hate was well balanced with the exeption of when one tank got charmed. Donning my PDT set the damage I took was not very threatening. On the very last fight I ate several TP attacks form Astral Flow just after I canceled shadows and recasted Utsusemi: Ichi. I believe I didn't have stoneskin up either, which is why I went down. Other than this there were some close calls, but nothing a quick cure couldn't fix.

This was only the second time I tanked something on RDM/NIN. The previous was the tier 3 Mamool ZNM. That worked out ok, but it wasn't ideal due to it attacking with fists and casting a lot of AoE spells. This, on the other hand, was a fight in which surviving the big damage bursts and not getting hit with Doom were the most important bits. Two tanks made charm less of an issue, but still there was one occasion where both were charmed in quick succession. Zoning hate and keeping avatars on it made that less of a hassle than I expected it to be.

I started out using macros for recasting shadows with gear swaps, but for some reason it seemed slower. I get a feeling there is a bit more delay when casting magic from a macro. It could just be my imagination though. I ended up casting from the magic menu and fulltiming AF hat. I have no enmity set for RDM and I don't have a macro set for RDM tanking. Despite all that, it was really simple to keep spamming hate spell, shadows and buffs. Nosferatu seems immune to slow, elegy and paralyze. Solo tanking would put a lot more pressure on the tank making it harder to multitask and time spells since you're guaranteed to take damage. There's a lot of optimization left to be done, but RDM tanking is already showing its potential.

Thursday, May 20, 2010

Dynamis - Windurst, a tale of redemption

"Are you going to make a blog entry for every Dynamis you go to?" Well, probably not forever, but I certainly will for the time being since I'm learning something new each time we go.

An interesting thing was that I found a mistake in the Dynamislounge Windurst map. Nothing groundbreaking, but still important to note that they're not 100% accurate. So, if anyone else has to lead a Dynamis for the first time, my advice is to not do anything too complicated based on the mob pop information on the maps. The mistakes were that statue 052 pops when 046 is aggro'd and isn't normally up. I can see why you'd make this mistake since you generally pull the NM from the south. We turned around after getting timer statue 041 and went clockwise. We ended up back at the MNK NM with time to spare so we kept killing. This is why I could see that 052 isn't up by default and only pops after aggro. The second mistake was that statues 054 and 055 pop when 057 is aggro'd. The map pop information says that they pop from 053. I pulled the first statue on the roof (056) before 053 and it didn't link.

Cleared the MNK house and made our way to the AH area to clear the statues southeast of there which we skipped on the first pass. My goal was to avoid any unnecessary risky pulls (for the most part) after we got the final timer. We weren't going for the win and so there was no real reason to pull NM's but since there weren't any statues left besides the ones at NM houses, which is why we cleared the MNK.

The lack of any risky crap (like clearing SMN house the previous Windurst run) made it so we didn't have any large wipes. Still some deaths. Mostly from statues hitting mages. We had Argonar as main sleeper and he does a really good job. I wasn't thinking straight when I put the main sleeper in the BLM party to refresh and cure them in addition to sleeping. It became obvious to me very early on that I had set that party up wrong. As a result I did a lot of Curing for the BLM party even though I was not part of that party. Thank heavens for stal. Biggest lesson from this run IMO was "put a dedicated refresher and healer in the BLM party". The bridges in this Dynamis make kiting statues pretty hard without getting hit or risk running it away from the other BLM's. So whenever we had more than two it was a matter of keeping BLM's and the person that was kiting the statues alive. There is no designated statue kiter, but by default it's the sleeper and puller.

In the end I think it was the most efficient run I've lead so far. No large scale wipes, lots of mob kills and good drops to boot!

Wednesday, May 19, 2010

Triple drop Omega

Apologies for not having screenshots. It totally slipped my mind. Let's imagine it! Twelve people in a dark wasteland. A mechanical monster that shoots fricking lasers.

I was worried since we lost our previous Omega. So I asked if we were doing anything different. The answer I got didn't inspire much confidence, but when we entered people WERE instructed to go for broke on the last 25%. So instructed, so executed. I tried to "help" with pods by stunning but I didn't bring my PDT set. When the last one popped for the final form change I realized I could have caused a serious problem with my "help". I was standing away from the BLM's (because that's where people wandered off to at the start) and I either stunned or nuked and got hit by the Pod with about 120 HP left. He was on top of me but luckily NOT out of range of the BLM's, that were already casting their nukes. Had they been out of range and one of them or melees the next target (melees weren't subbing NIN) they would have to wait for the cooldown after your spell is interrupted (or target out of range) and someone would have probably died for no reason. Lesson learned. I'm not going to help unless I can take 2-3 hits from it AND standing in the vicinity of the BLM's.

I had been working on one MP pool up to that point and I didn't want to waste a convert on low HP and without enough MP to top myself to over 800 HP I asked for a cure. Waiting for a cure I ended up verting when Omega was at 5-10%. I was going to CS Stun to be safe, but that ended up being unnecessary. BLM's used stun freely and/or on reaction to TP abilities which I think helped enough to make RDM/DRK superfluous.

Drops were our first Homam Corazza, Legs and Feet. Congrats to Xaya, Cyrille and Kingcem. Also, a Magenta Chip dropped form the last Pod, which is unfortunate since NW is a fun and easy zone with a lot of coins.

Monday, May 17, 2010

Furthering the grind - Dark Knight

My DRK is sitting at 69 at the time of this post. The last two parties I was part of netted me close to 60k EXP. Needless to say, I'm making progress. I've watched my Scythe skill go up and my Guillotine damage approaching 1k without Souleater. The following is my highest so far.


I made the last two parties myself. This is the best way to avoid the frustration of mistakes and problems that aren't caused by yourself. Notice how I didn't say I don't make mistakes. It's just easier to deal with when it's yourself and it does seem to produce better parties from my own experience. In those parties I teamed up with Enigmas, who is also leveling DRK. The first 30 minutes she made me deeply regret gimping myself. I didn't have capped skills, ate the lowest form of accuracy food (crab sushi) since I was expecting to do Colibri when I passed by AH. Add to that her 5/5 DEX merits and my accuracy was lagging significantly behind hers. I bummed a Marinara Pizza off her for the rest of the exp and I did my best to catch up in the parse.

What that taught me was that if I opened the fight with Absorb-ACC and I timed Absorb-TP to the limits and doing my utmost to get two WS in one SE I could close the gap and even overtake her. However, this was only possible when we had a RDM. Also, sometimes I saw the healer running low on MP and I would cancel SE after the first WS. Even without riding SE, I could get off a lot more WS if I got high TP absorbs. I started using stun before Absorb-TP to lengthen the time the mob would build up TP and also to prevent it using Cocoon right when it was too late to cancel my casting (Cocoon has the shortest charge time of all Crawler abilities). Here is one of the highest ones, though I believe I got 100+ at some point.

Before ~25% HP mobs don't use TP as frequently and you can wait a bit longer to Absorb-TP. I would usually try to finish my TP from the previous fight, WS and then Stun > Absorb-TP. This was very effective until I told Engimas what I was doing and we started competing for the big Absorbs.

Both PT's consisted of 3 DD's. Two DRK's at all times and a third DD which always, except in one case, fell a pretty far third in the parse (one WAR and one DRG). The one exception was a Galka SAM that showed us why SAM is still top DD. I'm glad both Enigmas and I have that leveled too or we might have felt inadequate!

Now that I've brushed the topic of party setup I'd like to touch a bit more on what I think makes a good party excluding things like gear and food.

Killing power:
  • Accuracy (Madrigal, Hunter's Roll, Quick step, Gravity, Ecliptic Howl)
  • Damage dealt (Minuet, Chaos Roll, Dia, Drain samba, AoE Enspells)
  • Speed, a.k.a. Haste (March, Haste spell, Hastega bloodpact, Haste samba)
Survival:
  • HP recovery (Cures, Waltzes)
  • Damage reduction (Ninja subjob, Haste spell and March for recast reduction)
Longevity:
  • MP recovery (Refresh, Convert, Ballad, Sublimation, Elemental Siphon)
I believe strongly in setting up your party with 3 DD's, 2 Support jobs and 1 Healer. I'm afraid it's purely a question of feeling right. With 3 DD's you have enough Utsusemi shadows to go around and truly minimize the amount of damage taken. So why not 4 DD? Well, as I mentioned in another post, Bards and other support jobs add a lot to party's killing power (moreso than an additional DD would) while at the same time adding to the party's Survival and/or Longevity. Especially since the effects are multiplicative. At some point you could drop the dedicated healer for a hybrid role or in case of a powerleveler, but that's a less common/realistic scenario for most parties. Some jobs can fulfil multiple roles so you have quite some freedom to mix and match jobs.

If you take a look at the buffs and debuffs I list I also consider Dancer, Summoner and Scholar to be support jobs in addition to the obvious Bard and Corsair. I especially fancy Dancer for its ability to back up the healer and allow the DD's to be a tad bit more reckless. I suppose a DD oriented Corsair would be great addition to any party, but I haven't had the pleasure to party with any of those yet. Dancers, Bards and Corsairs used to being asked to pull. Pulling is still mostly a thankless job (as I remember from my days leveling THF), but very important nontheless. Speaking of which, the fourth and final factor in making a good party is...

Kill speed and EXP chains:
  • a good puller

Sunday, May 16, 2010

Dynamis - Qufim: Loss

I almost called this post "Dunamis - Qufim: Fail" but it wasn't much of a failure considering drops we got. If only drop rates could be more consistent. This is what the treasure pool looked like after only 1 set of mobs.

After this we took what I'm pretty sure is the standard route past Scolopendra manta NM, 1 set of Rocs and Suttung golem NM. Got a really stupid link from goblin stats which killed our main sleeper. I tried to play the healer in the mage party but it didn't work out well enough. Some deaths cost us time and when it was time for the boss we had only 10 minutes left.

The bard rotation had just started when I reached the last corner to get to Delkfutt entrance. I got aggro from the Boss before I even saw it. Looking back I should have probably wiped right there though I don't know if we had anyone else capable of pulling it to camp. We had two strong DD parties who would have taken it out just fine if the pull was done correctly. So for that I take full responsibility (easily said since there aren't any repercussions!). I had enough gear and defense to take 4 Trebuchets which would have lasted to get to camp. However, I had a a WAR voke it to camp thinking he'd survive. He got killed in one shot and so I tried to pull rest of the way. On top of that it linked a goblin statue. Pull sequence looked like this:


First Trebuchet that hit alliance did a lot of damage (obviously) but I'm not sure if that's what wiped them as my log doesn't show all the deaths. It must have been, I don't see anything else that could have other than Grand Slam which happened towards the end.


That picture also shows we did have a RDM/DRK to Chainspell Stun. He was outside of the main alliance so some people missed it who then later proposed we bring one next time. As I said then and I hope to explain here, CS Stun wasn't our undoing. Also, Trebuchet is supposed to be an AoE attack that ignores shadows so I'm not sure what I'm seeing here.

I believe aside from the terrible pull and the links something else that could be improved upon is waiting to engage until it's exactly at camp and not cast anything on it that might gain someone hate from a distance. Getting hate from a distance would cause it to use Trebuchet again which is something you want to avoid at all costs.

A clean pull is probably possible if you're extremely careful about pathing. However, that might take too long even if there's a PLD to make it walk where you want it to. I think an alternative is to pull through and past the main group into the cave towards Suttung. Make sure nobody is resting and drop party/alliance before pulling. This way I don't get hit by any songs while running past and BRD doesn't get NM's attention. I pull all the adds into the cave as far as I can without getting into repop territory. Without the alliance wiping it should go down way before adds return. That's just an idea though. The simplest way is to just sac pull it, but properly next time.

Friday, May 14, 2010

RDM/BLU in Dynamis

Last Dynamis we did Jeuno. I decided to try to do some crowd tanking myself this time. I geared up my PDT set on RDM, ate a Taco and subbed BLU. For the very first pull I asked everyone to not sleep the train right away. I wanted to see how much damage I took so that I could decide whether or not to switch jobs right then and there. I thought it looked promising and continued on.

The most obvious thing while taking hits waiting for the mobs to be gathered up is that Simulacra (the statues) have a super huge base damage. I'd still get hit for up to 200 with all my defensive measures. Most of the time it was in the low hundreds, so I could take it a while. Other Dyna mobs hit for (depending on their job) 10 to 30 damage. Sheep Song got me on multiple targets' hate list, then some barspells and buffs and I was set for when they woke up. I also pulled using aggro instead of ranged or magic. It was a bit more effective to get small pulls since it's so much faster than and precise. All in all it was very simple and effective and I'm going to keep doing it for City Dynamis.

For Northlands and probably Dreamlands Dynamis I'm going to try and get WHM to level 70 with a buffer so I can sac pull without great cost. Sac'ing on WHM is relatively common from what I've read, but since we don't have a WHM to spare most of the time, I might as well do it myself. My WHM was at level 66 before I decided bring it to 70. I made a MMM party on Wednesday and although the first run was kinda slow and really close (had to unsync near the end), Allied Ring + Anniversary Ring + Emperor's Band make for a nice chunk of exp.

Monday, May 10, 2010

Damage mitigation overview, part 1

There are a lot of different things you can do to reduce the damage you take from melee attacks. For example: Defense, Physical Damage Reduction, Evasion, Parrying, Shield Blocks etc. Of this list Physical Damage Reduction and Defense are the "reliable" ones in the sense that they will affect every single hit that actuall lands. The others are based on chance. I believe this is the reason why tanks prefer to max out these stats before the rest. Even if the law of averages implies (assuming a normal distribution) that the "less reliable" forms of damage mitigation will just as often reduce more damage as they will reduce less damage compared to their average amount.

Evasion
I believe evasion is severely undervalued as a ways of damage mitigation. However, if you look at the math people use for accuracy calculations (which a lot of melee class players use to great effect) it says that adding Evasion increases your evasion rate by a static amount, namely +0.5% per point of evasion. This is similar to PDT in the way that each point of evasion added has more value than the previous. For example:

Original evasion rate: 50%
+ Optical hat (=+5% evasion rate)
= 55% New evasion rate
55%/50% = 110%
= a 10% increase from original evasion rate


Take this even further and you actually reach the point where a Wind Staff (+10 evasion) gives the same damage reduction factor as an Earth Staff (20% PDT) if you start from 0% PDT and 75% evasion rate. It's a very extreme situation, but it's still pretty crazy, eh? Well it was a surprise to myself when I ran the numbers.

Not only does evasion give increasing returns, the cap is much higher than most other forms of damage mitigation. Namely 80%. That's right, capped evasion reduces your damage over time from melee attacks by 80%. You might ask: "What does this matter? Most jobs can't even get close to capping evasion on anything that matters." This is true. However, most tanking jobs are not at evasion floor when tanking such mobs, meaning that adding Evasion has a small but non-trivial effect. [I have to retract the preceding sentence, this is probably only true for Ninja] Also, what about tanking on things that "don't matter"?

You can get up to -20 accuracy from blind spells. From my experience people don't care to cast blind on mobs since they're perceived to have such high accuracy in the first place. As long as you're not at floored evasion that's still -10% damage taken over time. It doesn't change a lot of play elements for most tanking jobs, but I certainly will consider casting Blind the next time I go RDM to something. It's also made me reconsider gear pieces like Koenig legs and Genbu's Shield (both have +10 evasion).

Defense
Calculating how much damage your defense mitigates seems pretty hard at first. Not everyone (including me) is fully versed in the ways of cRatio, p-dif and fSTR. If these terms are unfamiliar to you, it's worth your time to take a look at this page. From what I've seen these functions aren't fool proof or complete and the game will, on occasion, show different values from what you'd expect. Take a look at this graph:
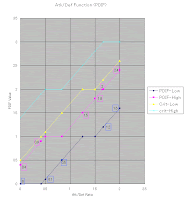
What does p-dif mean? It's what you multiply base damage by to get the actual damage. P-dif has a range and is not an exact value. The value is dependant on the ratio between target defense and attackers attack stat as well as the level difference between attacker and defender.

That's pretty much all you need to know. Looking at the graph with that in mind you will see that the lower left portion is what we are interested when tanking. I find it a bit hard to figure out what the average p-dif would be at atk/def=0 because of how p-dif can never be negative. I want to avoid getting too much into details, because I'm bound to say something wrong. I think it IS safe to say that in between atk/def=1 and atk/def=0, most of the time you can use
1 - 1/(1 + defense_increase/original_defense)
as a decent approximation of how much damage a single piece of gear or defense buff will reduce at the most.

To make a long story short: something like Cocoon, which raises defense by 50% will reduce damage a bit less than 33%. The higher your defense is compared to the attacker the lower the actual reduction is compared to this approximation.

The truth of the matter is that the exact function doesn't actually matter as long as you understand its shape. As long as you know that defense will help an amount relative to your current defense and that its effectiveness decreases as you reach low atk/def ratio's, then you can make better decisions for gear.

Complicating the matter
So, now that I have given myself a way to compare defense, evasion and PDT, I can make gear and buff choices based on some type of data and less on gut feelings and general consensus. However, some types of damage mitigation can't be boiled down to a percentage so easily as others. Take Phalanx. Its damage mitigation factor depends on how much average damage you take from melee hits, something you won't know until you've take many hits to the face. What about Utsusemi? The damage reduction factor can only be calculated for melee hits once you know how many shadow absorbs you get relative to the number of hits you take. This depends on things like spell recast and mob attack rate. I didn't touch on fSTR because of this as well. The more VIT you have the more the attacker's base damage decreases, but the actual percentage depends on the mob's base damage before the reduction.

Remember that this is all for melee hits only. There's a big difference in priority when you bring monsters' TP abilities into the mix. Some of them are magic damage. Some of them are more susceptible to evasion and others to defense.

All reduction factors can be applied in sequence (order doesn't matter except for rounding) to produce the total reduction. Another complication is that there are cases where multiple forms of defense can proc on the same hit. Think of Shadow Mantle, shield blocks and Phalanx. Here the overlap reduces the actual damage reduction factor.

Conclusions
There aren't any. This is not that kind of post. If anything we can summarize this post as:
  • Evasion has increasing returns like PDT.
  • The damage reducing factor of Defense can be approximated.
  • Things aren't as simple as the numbers, but numbers help.
Weekend update 2

Did some Dynamis Buburimu on sunday and got the win for some people. Two WAR belts dropped, one SCH -1 piece and a BLU cape. Grats to people on drops. Again, this was a bit of a data gathering run for me personally. Had two bards in DD party which worked out pretty well. Next time we can start pulling Dragons a bit sooner. I think the mobs in dreamlands Dynamis are higher level than those in cities and perhaps even northlands. Their evasion was pretty high and they hit much harder than I ever remember being hit for while pulling other areas.

Friday wasn't as successful since we... *cough* lost an Omega. After the failed run I wondered why we ever won the other times. Tanking the first phase isn't really an issue at all. It was only the second time going PLD to Omega, but it's really not that hard to tank. Normally we had more damage output during the final 20% which took it down really quickly and Colossal Blow didn't bother us. This time we were low on damage and nobody seemed to really pick up on the fact that I got hit with Colossal Blow early on. I actually popped Sentinel right before getting hit, which surprisingly (to me anway) reduced the damage of CB. Stellina tanked for about 1-2 min afterwards before getting hit by CB too. I was spamming as much hate as I could during that time, but when I saw CB I pretty much instantly used Invincible. I asked if I should start kiting now. Kiting is something we actually never did with this group, so I didn't really expect anyone to say "go ahead". Third CB hits me and people start dying. Stel was actually down too. I proceed to kite, but you can't solo kite Omega without stuns. A better way is bouncing hate between PLD's and using stuns. Without hate from the previous 80% as a basis even when Stellina was back up we couldn't keep it up. Any cure would pull it right off one and onto the other who was unbuffed and low on MP. I have no clue why we had no RDM in the tank pt. If we had prepped for the 20% and actually conciously tried to gank/zerg the last part, we could have won. However, as a group we seemed oblivious to the change in modes and didn't show any increase in damage. We actually held back more since it seemed people were scared of pulling hate after hate was unstable. Aaaanywho...

Saturday I used the second charge of my Allied Ring on DRK. It turned a very mediocre party into a decent party which then later turned into a decent party by itself when the SCH switched to BRD and the full Artifact DRK started eating Sushi upon my suggesting it. I'm glad I was parsing or I may not have noticed how low his accuracy was. My skill was gimped and only learned Guillotine an hour into the party. We had a PUP but I think it had crap for attachments and/or underskilled ranged skill cus it was missing something awful. Souleater Guillotine on the last %'ages of a mob is quite amusing. I hit 66 in that party. Gotta take another break on DRK though since my RDM and THF buffers are suffering their lowest level in ages. My THF was capped no more than 3 months ago. Now it's at 6K from eating all the R1's in Salvage and Dynamis and the occasional HP.

I'm working on a tanking article to post on this blog soon. Ever since I started thinking of different ways to do crowd control in Dynamis the contributions of all the factors that mitigate melee damage started swirling in my head. I got some pretty neat ideas from it even if I say so myself.

Friday, May 7, 2010

Another Dynamis recap

I'll keep this short because I don't actually have much to say about it. Check the WoA Blog for pictures of drops.

Notable things that happened?
  • East Gate "inner" statues (inside the gate area on the grass) can't be done like the video in the next point. The first one seemed to pop mobs right near the NM statue. Will probably clear one extra statue (15 according to this map) next time to give me somewhere to run to when sac'ing.
  • This didn't work for me. Nearest "inner" statue has a weird pathing issue where it walks towards and links the two center moving statues and the whole gate area eventually. This probably happened because I started running too soon after pull making it redo its pathing. Kited and sac'd first pull towards the weapons' shop and Suri grabbed NM.
  • The rest of the West Gate was a series of 2 or 3 sac pulls with 3 ppl grabbing mobs off the train.
  • AF actually dropped.
I think I might start pulling on RDM/BLM soon so I can assist sleepers. However, I want a 102% Spell Interruption setup first so I can sleep trains even when taking hits. I need some merits for that first though, since I don't feel like waiting on a Solitaire Cape. Besides, If I don't rely on Muse Tariqah or Solitaire Cape, I can keep wearing Cheviot Cape and Genbu's Shield while being uninterruptable!

Monday, May 3, 2010

Tinnin downed DD tank style


...and an Enkidu Harness dropped for me! We did three pops total. I think the LS has at least one other pop waiting, but they weren't on at the time. The thing I enjoyed the most about this was the fact that we used a SAM and a MNK to tank it. We had a full alliance which means we could have easily afforded a pair of Paladins. So why try DD tanks anyway?

Tinnin is immune to non-elemental magic damage like Spirits Within and Atonement. That takes away a reasonable amount of their hate gaining ability. Not to mention Atonement adds up to a nice chunk of damage. DD's gain hate perfectly well when they're able to hit something consistently. They add more damage than PLD's would, especially in this situation. Survivability could be an issue for Trembling, which is a physical high damage TP ability that will hurt badly if you don't have any shadows on. Proof of this is that Skinwalker on SAM/THF (there to help hate management) died to it each fight.

In my opinion the keys to making this work were:
  • Immidiate Cursna and Poisona after Nerve Gas and Paralyna after Polar Blast.
  • Constant debuffed Tinnin.
  • DD tanks buffed with Haste, March, Madrigal and Minuet.

For the first part Rcake (WHM) and I (RDM) took care of one tank each. When Tinnin had 3 heads up and it used a Bulwark we could start casting before Nerve Gas actually went off. The amount of time that tanks were cursed and poisoned was very short which greatly reduces the chance of either going down. I wasn't always on the ball with Viruna though. Especially the first fight I wasn't multitasking very well. Rcake is a very active WHM. I know from past experiences he's really fast with status cures and knows what ability inflicts what status in the first place. It really helps if we can trust on healers and support to know the fight's details without having to explain it to them before we start. Rcake is a good example of a proactive WHM.

I dropped the ball on keeping Slow2 on Tinnin. Several times I missed the "wears off" message due to doing something else. I don't use any tools to assist and so even though the duration of Slow is predictable, I have to keep track of it while doing something else and it turns out that isn't my forte. We had two Bards in the main party. One subbed BLM because I wasn't sure how hard it would be to land Elegy. Slow2 landed no problems, even in a full MND set. I asked two BLM's to use ES Paralyze to help smooth things out. It wasn't necessary, but it certainly had an impact for the time it was on. I couldn't land it in my standard Para build. I didn't take time to change my macros and instead just asked the BLM's when I thought Para would be the most useful.

As I mentioned before, we had two Bards in the main party. Double March, Minuet and Madrigal on DD tanks. I asked Helly for Minuet/Madrigal purely on a guess. I don't know what the tanks' accuracy was actually like. It could well have been more efficient to do double Minuet. I took care of Hasting tanks and refreshing Rcake. Along with keeping Slow2 on and looking for Tinnin's abilities that gave me 3 (types of) things to do (not counting buffing myself). As the fights went along I got better at juggling these things, but I'm no Avesta.

We had a full alliance with a great deal of additional fire power. I told the 6 BLM's to hold back until all 3 heads were back. By the time this happened we had taken about 20% of its HP using the DD tanks, some dots and a single SMN doing BP's. After that the 6 BLM's took the Tinnins down in a very short time with hardly any Draw-ins. Only the last fight had some Draw-ins, but nothing serious.

All in all it was a successful raid (2 harnesses and 1 cap) with only a few deaths. Mostly Skinwalker biting the dust, but Kittan, one of the DD tanks, actually went down on the second pop. I told everyone to focus and assist Kingcem (MNK/NIN and second DD tank) and other than the TP spam from a head regenning he didn't take any serious damage. I think a single tank could work though it may be an unnecessary risk depending on circumstances. The damage from the BLM's helped keep the fights short and reduced the chances of something going wrong. The longer the fight, the more random unlucky things can happen after all. Still, I can totally see this same strategy working without as many or any BLM at all. As long as the core party has their game faces on. An additional healer in the ally doesn't hurt either.

I'm glad I it worked out so well and have potentially won some people over to the idea of DD tanks.